Thursday 28 February 2013

Workshop - Lessons 4, 5 & 6

Continuing with my previous workshop lessons, I have finished bending and curving my wood and aluminium (photo below)  and have now also finished drilling and screwing my aluminium onto my base. Next lesson I will need to drill a hole for my plug and wire to go through and then will also need to solder my led strip to the wire.

Some problems I had in the workshop were:
- my first hole and screw were to low making it so I wouldn't have enough space for my plug and wire.
- Mr Andrews is not always available and this made it quite hard for my to talk about my design.
 What I did to help/fix these problems
- I undid my first hole and screw and measured it out again so that I had enough space for my plug and wire.
- I had to wait and ask some of the other girls for their opinions about what to do. While I waited I also help some of the people who were further behind than others.


Wednesday 20 February 2013

Workshop - lessons 1, 2 & 3

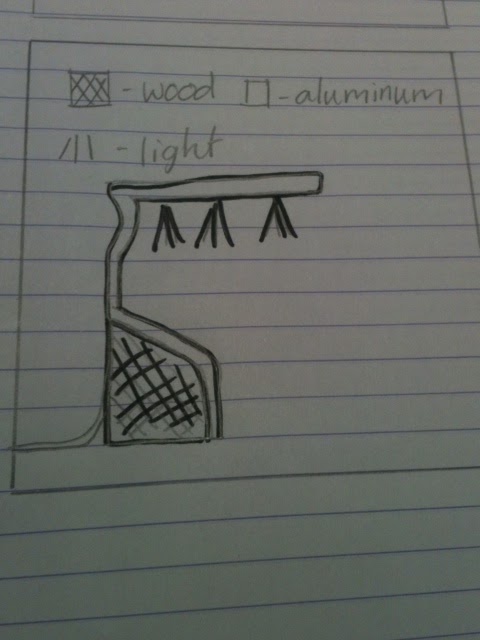
These past few lessons we've been working in the workshop. I've completed a full scale drawing of my base and my aluminium stand. I am using all my aluminium and am not cutting off a bit like some others. I have cut and sanded my base and it is all done. I have rounded the wood on all the corners so it feels more natural and organic. I have just started bending my aluminium and am going very well with it. I need to do my main bend and then I can move onto my next step of making my lamp.

Some problems I had while doing the first steps to my lamp were:
- I was a little nervous using the jig-saw as my piece of timber that I was cutting out was quite small.
- I wasn't sure if the degree of my bend would kink the aluminium and not make it look very good.
- I didn't know if I had enough aluminium to make and bend for my lamp.

What I did to fix/help these problems were:
- I asked Mr Andrews to help me and show me how to do it. He then supervised me while I was cutting.
- I asked Me Andrews what the maximum bend would be and then changed my design to fit the bend.
- I measured how long the aluminium was and the measured what my scale drawing was to make sure it fit.


Wednesday 13 February 2013

Final Design

So after  talking to quite a few people around the boarding house and calling my parents numerous amounts of time for their opinions and ideas, I have decided to go with design number four. This is because I think it will be less predictable (as I'm not using a triangle to balance it), it is quite an easy and space saving design and overall this was my favorite because it fits into my space at home very easily. I am posting a picture below with an A4 sketch so I can use it in the workshop as a template. :)

I might change the front of the base so that it doesn't take up as much space. Will try and get a photo up soon.

Fourth design


This is my fourth design for my LED lamp. 

Pros:
- The base looks big and heavy.
- It has a large area at the top for LED strips to go. 
- It has a very organic shape to it and I like how the aluminium curves around the wood.

Cons:
- Even though the base is quite big it looks unstable.
- The top of the aluminium doesn't.
- Its quite a thick piece of wood and I don't know how well I would do drilling my hole for the plug and wiring.

Some of the aspects are good but I don't like the overall design and don't think it would be very practical. 


Third design

This is my third design for my LED light.

Pros:
- I like how it is not using as much aluminium as my other designs.
- I like how the aluminium is on an angle where the light is going to be giving it more area to light up
- I like how the back base is quite tall giving it a bit more balance.

Cons:
- The main part of the aluminium might be to long giving it an off balance look.  
- Its not very ergonomic and hasn't got many organic shapes.
- It looks like it might fall over sideways.

This is not my favourite design, though I do like some of the aspects in it but I don't think I will use this one.

Second design

This is my second design for my LED lamp.

Pros:
- I like how the curves to the aluminium look very natural.
- I like how there is a piece of timber at the front to balance it out.
- I like how the aluminium is on an angle where the light is going to be giving it more area to light up

Cons:
- I don't know if the piece of timber will balance out the whole lamp, and if it might fall forward.
- I may not have enough aluminium to create the large curve.
- The aluminium may not fit over the timber and curve at the same time.

I prefer this design to the first one because of the organic shapes.  

First design

This is my first design for my LED lamp.

Pros:
- I like the shape of the base.
- I like how the aluminium would go through the wood making it look natural.
- I like how stable it looks to be.

Cons:
- Having the base this way would mean the light is mainly going over the wood and not what you're working on.
- I don't know how I would screw both the pieces of wood onto the aluminium.
- I don't think it would give enough light. 

I like this design but I don't think it would work very well.

Term 1 - Week 1, 2 & 3

This term in Design and Technology we are creating an LED light out of aluminium, LED strips and wood blocks. During class we have been drawing isometric drawings and views of our light designs from the back, front and side. We have also completed all of our OnGuard tests, this means we can use all of the hand-held tools and almost all the electric tools, e.g. The belt sander. I will post some photos up of my designs later as I need to take photos of them all.
:)